
Step-by-Step tutorial for web-based measuring of comets
The following tutorial presents an example of how search for and measure comets using web-based software. Here we use the PixSpy as an example of a particularly intuitive interface, but there are other websites that have similar functionality. In our other tutorial, we list local software-based options for comet hunting. It remains the responsibility of the user to find a tool, software package, or software language that is suitable for their personal computer and needs. We do not and cannot endorse any specific software website, tool, or application. (See also disclaimer at the bottom of this page.)
STEP 1: Download some images
There are several sources on the Internet where it is possible to obtain the SOHO/LASCO data, but most comet hunters rely on the NASA/ESA/SOHO Homepage, which releases fully-processed .jpg images in near-realtime.
When we are in contact with the spacecraft, these images are usually processed and released within five or ten minutes of them being taken by the satellite. These are certainly the easiest data product to work with as they require no preparation, but they are sometimes a little slower to appear online than the science (FITS) data. The jpeg files from the SOHO Homepage are available here, and can be accessed directly at links like this: https://soho.nascom.nasa.gov/data/REPROCESSING/Completed/2021/c3/20210421/. The last three parts of this url ("2021/c3/20210421") refer to the year (2021), camera (C3), and specific date of interest (2021-04-21). You can access data from any time in the mission (1996 to present) using this https://soho.nascom.nasa.gov/data/REPROCESSING/Completed/{YYYY}/{cc}/{YYYYMMDD}/ url format for both the c2 and c3 cameras. Comet hunters are encouraged to use the maximum resolution "1024x1024" images, but the brighter comets can be seen in the smaller images at times.
For the purposes of this tutorial, go to this page, which lists all the processed images for LASCO C2 for 20190619 (June 19, 2019). (As an aside, note the format of the last three parts of the url: "2019/c2/20190619" - you can change this to any year/camera/date of your choosing when you want to find SOHO data.) From the 20190607 url, right-click and save the following three images to somewhere on your computer: 20190619_1212_c2_1024.jpg, 20190619_1224_c2_1024.jpg, and 20190619_1236_c2_1024.jpg.
STEP 2: Upload the images
Again, we are using PixSpy as an example, but there are other website that have similar functionality. Per the website instructions, either drag-and-drop or upload those three jpg file to the site. It will then take you to the display interface, which should be showing the first of your three images.
All such sites will vary in their interface, but in this example we see the interface has a crosshair that follows the cursor as you move it. Immediately next to the cursor, the display shows both the x and y pixel coordinates of the cursor, and the red/blue/green (r,g,b) color of the image pixel beneath the cursor. Here we are only interested in the x,y coordinates, so you can ignore the rgb value. This particular site also offers the ability to step through your uploaded images by use of the left and right arrow keys on your keyboard. You can also zoom in/out using your mouse scroll wheel.
STEP 3: Look for a comet
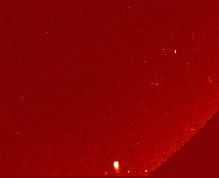
Flick through the images and see if you can spot something that looks like a small comet. [SPOILERS BELOW]
This is daunting at first. There's a lot happening in the images and it may seem impossible to decide what is a star or planet, what is a cosmic ray (noise), and what is a comet. Experience and practice will be your ultimate guide on this - it can take a while. You can refer to the guide for some help on how to recognize these features.
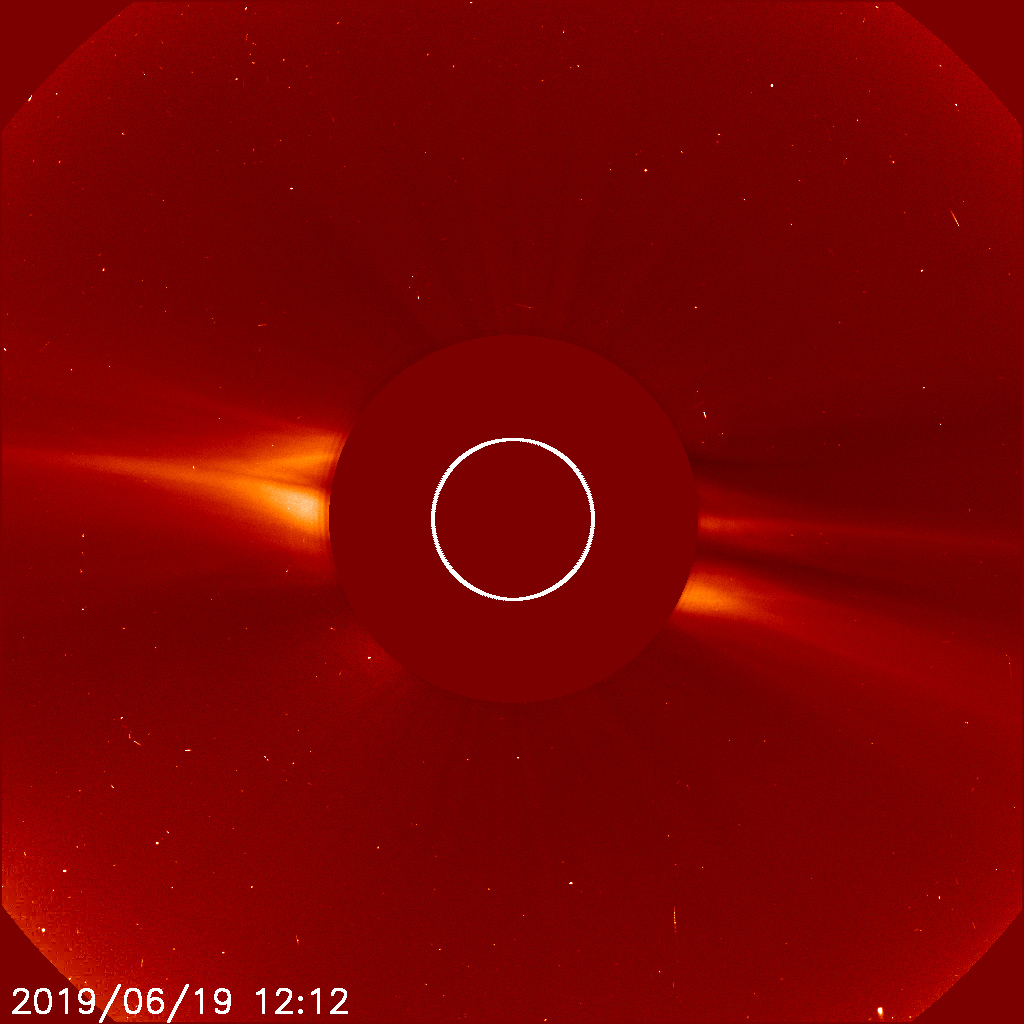
If you struggling, look in the lower-right hand corner and hopefully now you will see it!
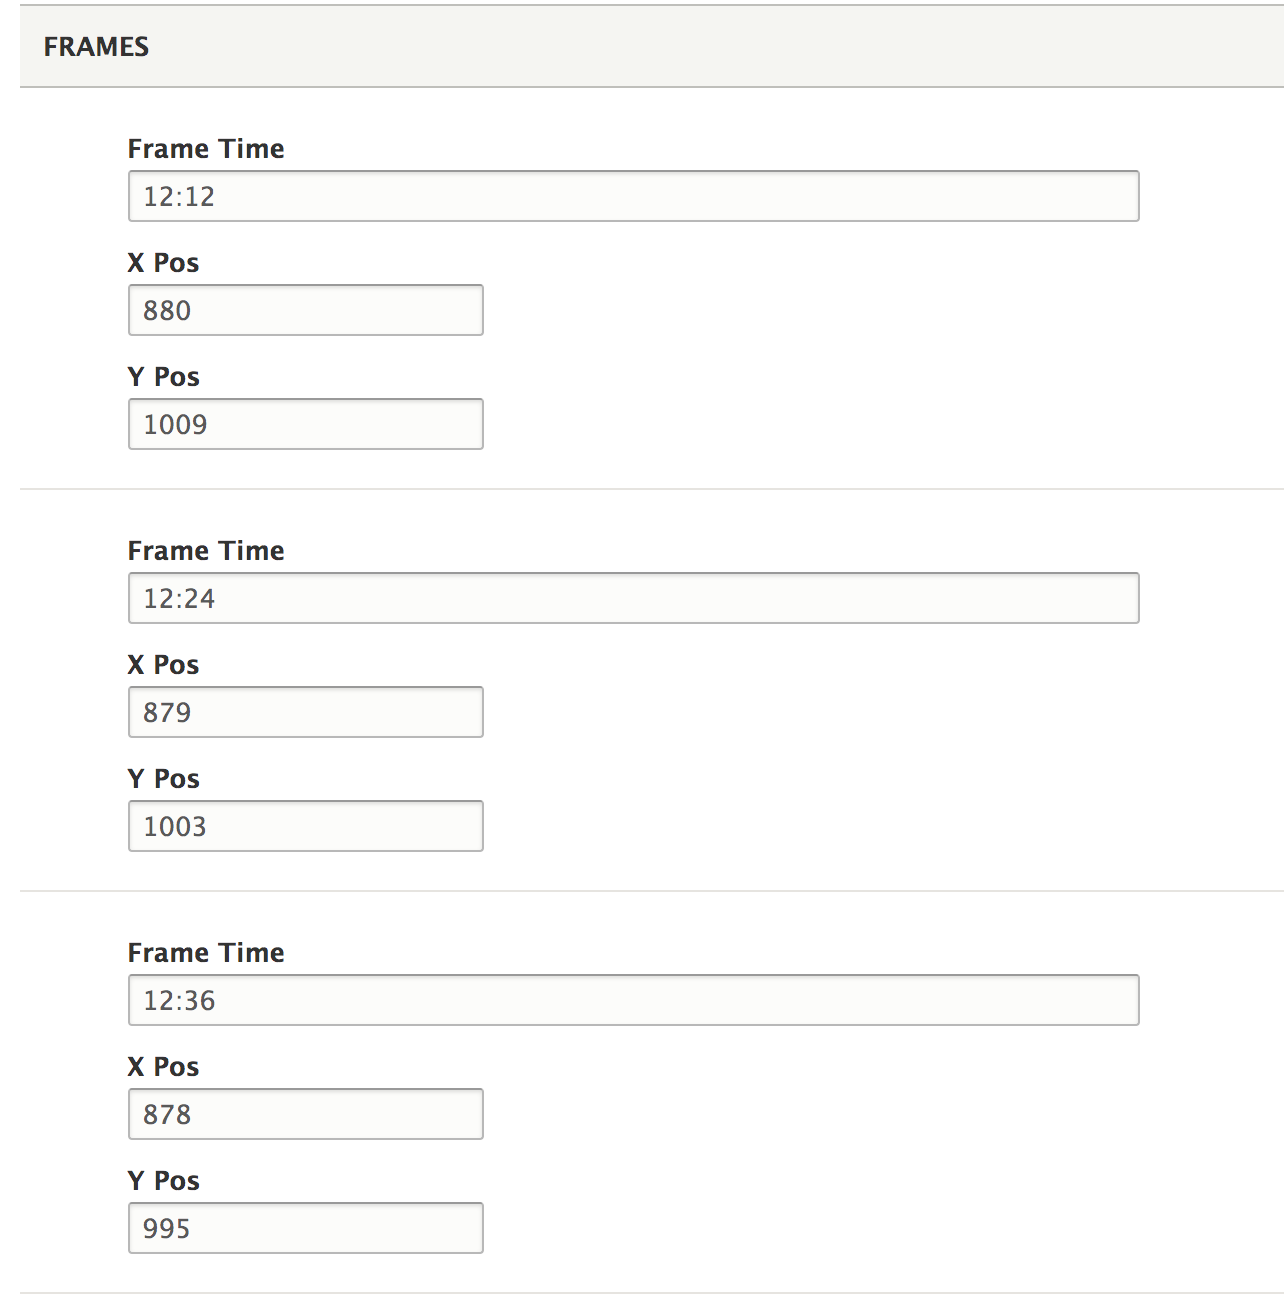
STEP 4: Measure the comet positions
To submit a comet report, we need to know the dates and times of the images you're looking at, and the x and y pixel positions of the object you are reporting. This is why it is important that the tool you use has the ability to display x,y pixel values. The time stamps are written on the images themselves, in the lower-left corner.
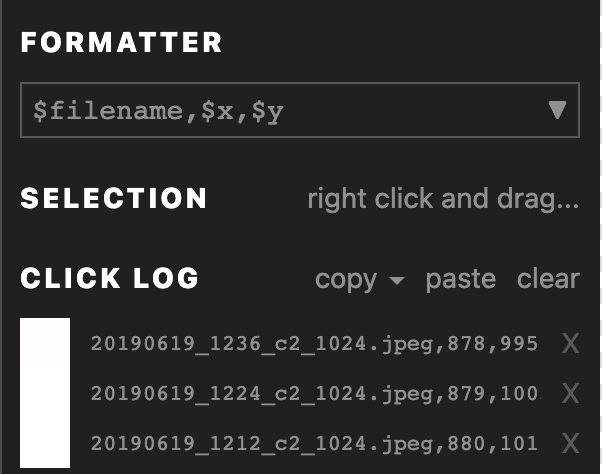
We want to start measuring the comet in the earliest image (12:12UT, or "20190619_1212_c2_1024.jpg") first, so use the arrow keys to select that image and hover the cursor over the comet. In this first image - 12:12UT - the cursor is showing a value close to "880,1010" for the comet location. There might be a difference of a pixel or three depending on your software and where you position the cursor - that's ok.
With this particular web tool, there is the option for the site to record the x,y pixels as you click on them in the image. Under the "FORMATTER" drop-down menu, you can select "Add Custom Formatter" and enter "$filename, $x, $y", and now when you click on a location on the image, the filename is displayed with the x,y pixels alongside it. This is an optional step, but makes it easier to record positions. Just note that the long filenames for the SOHO data sometime result in the fourth digit of the coordinates being cut off, as you can see in this example, which displays "100" and "101" instead of "1002" and "1010" -- so just something you need to watch for if using that tool.
All that is left to do now is measure the other positions in the other images, via the arrow keys (and also zooming in, if that helps you). For this object, you should be left with coordinates that are something close to:
20190619 1212: 880, 1010
20190619 1224: 879, 1002
20190619 1236: 878, 994
Again, a few pixels difference here or there is not a problem. These would be the positions that get entered into the comet report form.
STEP 5: Report the Comet
To keep this tutorial short, we are assuming that you have performed all of the necessary checks to make sure that your reported object is indeed a comet. It is strongly encouraged (required) that you are familiar with the instructions on what you should and should not report, and have tested to make sure that your potential comet obeys the laws of physics! All of that information can be found in the SOHO Comet Hunting Guide.
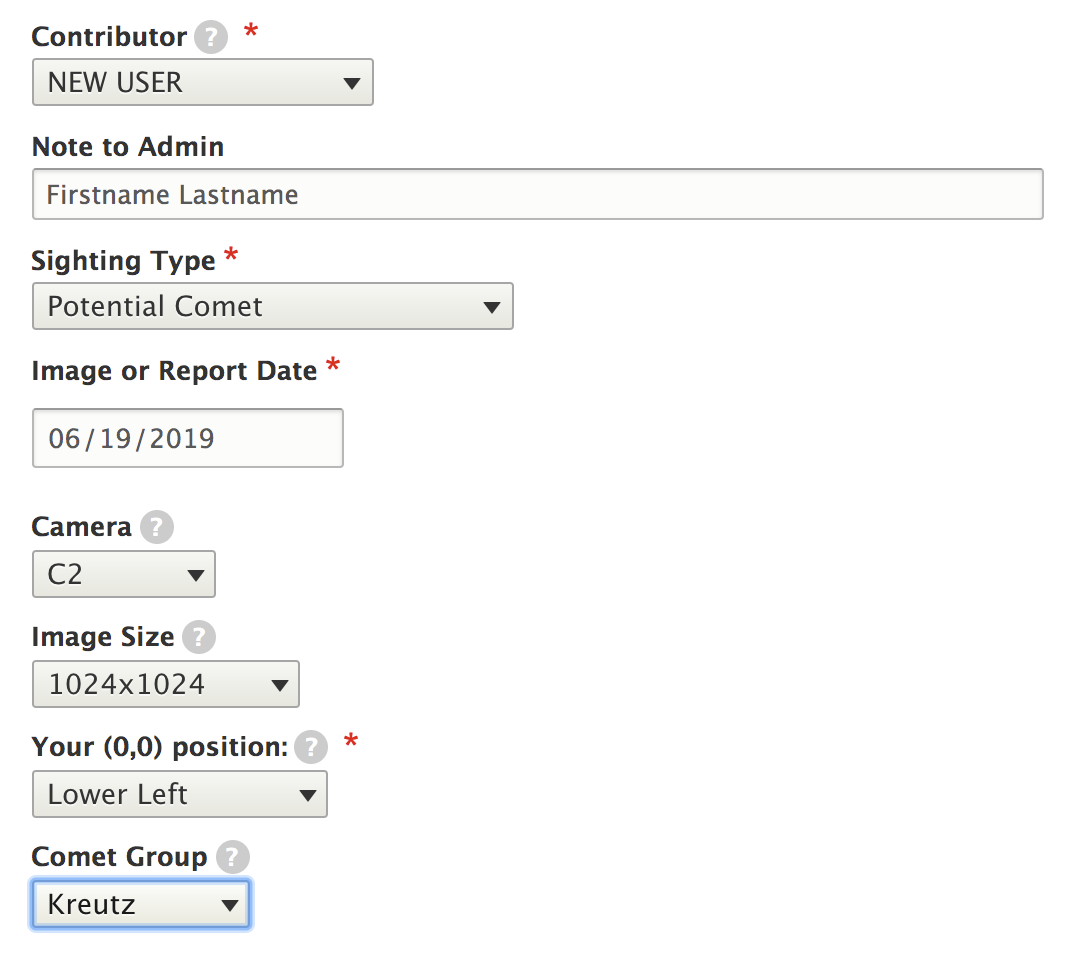
To fill out the report form, first select your name from the drop-down list. If your name is not there, select 'New User' and add a comment in the 'Note to Moderator' field with your full name. (We can not credit you with discovering a comet if we do not know your name!). You will then fill the form with the information shown below. Two important things:
1. The "(0,0)" position refers to the origin of your software's coordinate system. To determine this, place your cursor in all four corners of any image, and find which corner has the smallest x,y values (the values closest to (0,0)). Only one corner will have both x and y coordinates close to zero. On most Windows operating systems, this will be the upper-left corner. On Mac and Linux it is usually the lower left corner. In the case of this particular web application, we can see that the upper-left corner of the images is where the cursor has a 0,0 value, so "upper-left" is the correct choice in this example.
2. If you do not know which comet group your object belongs to, that's ok. Just leave it blank.
The critical information we need is your name, the date and times of the images you are looking at, and the pixel coordinates of the object. You do not need to worry about any of the other options until you are more familiar with the program.
Click the 'Save' button at the bottom of the page, and your report will be submitted. You can view the latest reports here.
Finally, we reiterate once more that you should make yourself familiar with the SOHO images and comets, what to look for, and what you should and should not report in the images. This information and more can be found on the Comet Reporting Instructions page, and on the Official Guide to SOHO Comet Hunting.
Looking for a more challenging example?
Here are some more challenging examples of comets to look for.
- 1. Download five or six images, beginning at the 09:36 image, from here. Remember to only get the images marked with "_1024.jpg". There is a Meyer-group comet somewhere in the upper-left quarter of the image. It is quite faint, and does not head directly towards the Sun. If you cannot find it, check the original report for the exact coordinates.
- 2. [Ultra-challenging] Download several images, beginning at the 09:18 image, from here. (These are LASCO C3 images.) Again, only get the images marked with "_1024.jpg". There is an extremely faint Kreutz comet somewhere in the lower-left quarter of the image, somewhere in the general vicinity between 190,900 and 360,750. It is extremely faint, and moving slowly towards the Sun. If you cannot find it, check the original report for the exact coordinates. If you still cannot see it, download more images from that sequence and it should become a little more obvious by ~13:42UT.
DISCLAIMER: The use of the "PixSpy" web tool here is entirely for illustrative purposes of how such a web-based application can be used to search for and record observations of comets. This is specifically not an endorsement of this website, or any other software application or website. It remains the responsibility of the user to choose which software package(s) to use, to determine if their computer is capable of running their chosen software package. We are unable to provide any assistance with obtaining or installing any specific software packages, using any web tools, or with any problems encountered while doing so.