
Step-by-Step tutorial for measuring comets using software
The following tutorial presents an example of how search for and measure comets using imaging editing software. Here we use the GIMP package, but there are many other software packages that have similar functionality, and programming languages such as Python are a flexible and powerful alternative. GIMP is free, well-supported, and quite easy to learn, but it is the responsibility of the user to find a software package that is suitable for their personal computer. We do not and cannot endorse any specific software tool or application. (See also disclaimer at the bottom of this page.)
STEP 1: Download and install your software
This tutorial assumes that you have installed GIMP, Photoshop, or some other equivalent software package that is able to handle images as 'layers', and can animate those layers. While the screenshots and wording below is based upon the GIMP application, the general terms are often the same between most photo editing software packages.
STEP 2: Download some images
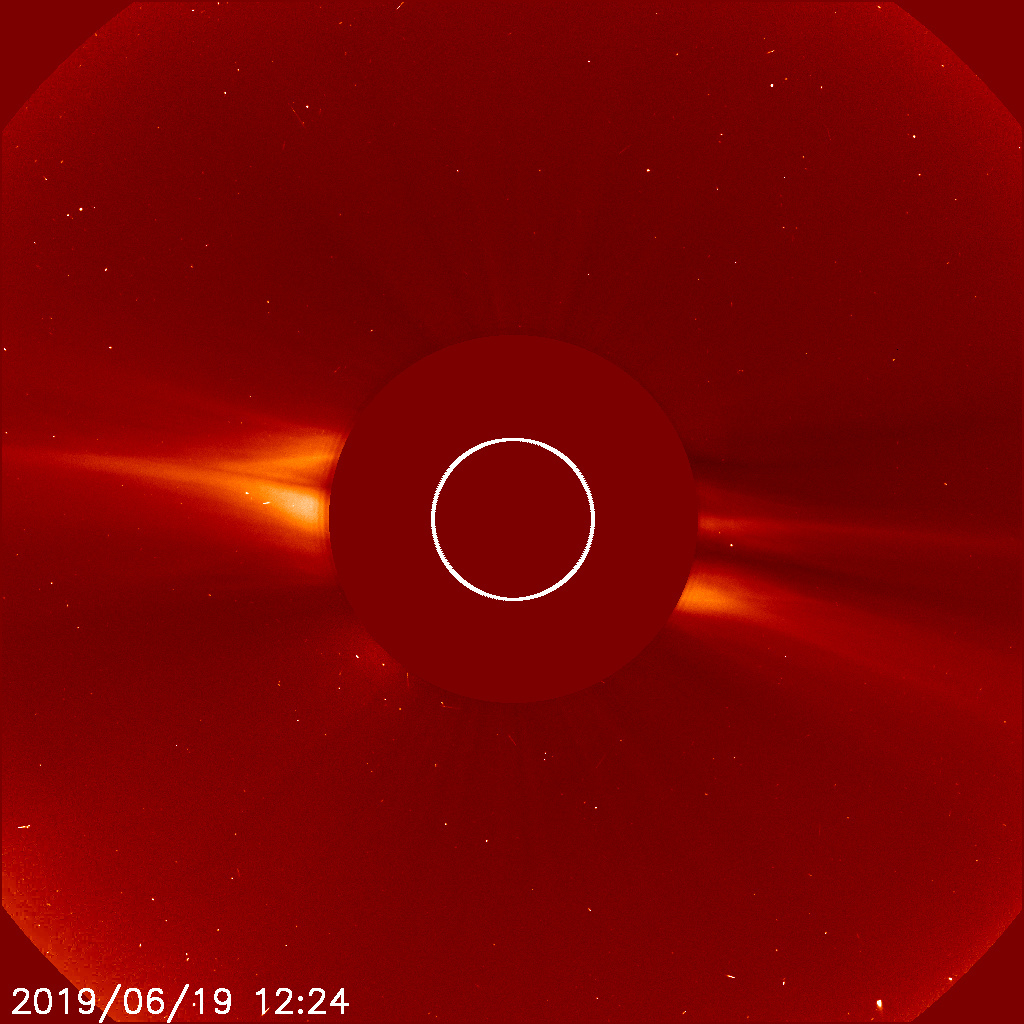
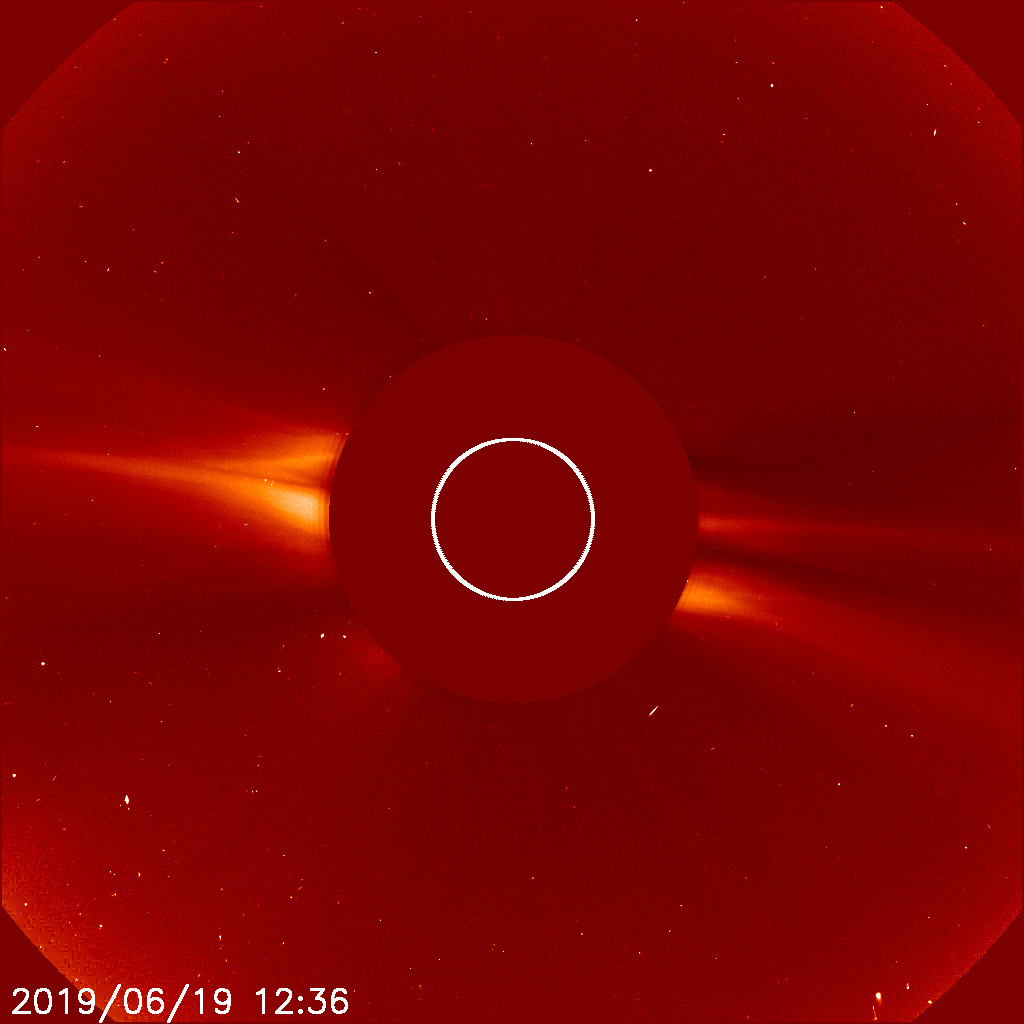
We're going to grab some images from the SOHO website. Go to this page, which lists all the processed images for LASCO C2 for 20190619 (June 19, 2019). (As an aside, note the format of the last three parts of the url: "2019/c2/20190619" - you can change this to any year/camera/date of your choosing when you want to find SOHO data.) From the 20190607 url, right-click and save the following three images to somewhere on your computer: 20190619_1212_c2_1024.jpg, 20190619_1224_c2_1024.jpg, and 20190619_1236_c2_1024.jpg.
STEP 3: Animate the images
Open you software application and open these images as layers. In GIMP, you would go to "File" menu, select "Open as Layers...", and locate the three jpgs you just downloaded. Select all three of them (either ctrl+left-click, or cmd+left-click on OSX) and select "Open". You should see something similar to the image below, but note that different versions of GIMP, different operating systems, and different software packages will all have different views by default.
For finding comets we want to animate the images - that is, view them in sequence like a movie. In GIMP, you would go to the "Filters" menu, select "Animation" and then "Playback...". This should open a new window that looks something like the below image.
If you can, I recommend you changing the animation speed setting to something that is not too fast. In GIMP, I change the speed setting in the lower-left corner to "0.5x" (half-speed), but leave the other option at "10fps" (frames per second), and would then click the "Play" button in the top left of the window to start the animation. You should now see things in motion.
STEP 4: Look for comets!
This is daunting at first. There's a lot happening in the images and it may seem impossible to decide what is a star or planet, what is a cosmic ray (noise), and what is a comet. Experience and practice will be your ultimate guide on this - it can take a while. You can refer to the guide for some help on how to recognize these features.
Of course this would be an awful tutorial if there was no comet in these images, and indeed there is a comet for you to find. Maybe you've seen it already but even so, follow these next steps too.
Most of SOHO's comet follow predictable paths through space, which means that we can predict roughly where in the images they will appear. Around 85% of our comets belong to the "Kreutz" family which, if you refer to our comet tracks page, you will see that Kreutz group comets in June, and in LASCO C2, will appear in the lower-right quadrant of the images. Most of the time, you will find them near the very edge of the images. They may be faint, but the example I've provided here is actually rather a bright comet. Hopefully now you have seen it!
STEP 5: Measure the comet positions
To submit a comet report, we need to know the dates and times of the images you're looking at, and the x and y pixel positions of the object you are reporting. This is where the photo editing software is particularly useful.
You'll recall that in "STEP 3" (above) we opened the images as "Layers". We now need to view those Layers and selectively turn them on/off - that is, toggle their visibility - so we can measure the comet positions.
Each application will have different ways for toggling layer visibility, and different versions of software packages may look slightly different. In GIMP you would press ctrl+L (or cmd+L on OSX) to open up the Layers dialog box, if it's not already open, presenting something that looks similar to this:
We want to start measuring the comet in the earliest image (12:12UT, or "20190619_1212_c2_1024.jpg"), so to view just that particular layer we need to switch the other layers off. To do that in GIMP we would click the little eye-ball icon that's immediately to the left of each thumbnail in the layers window, as shown below.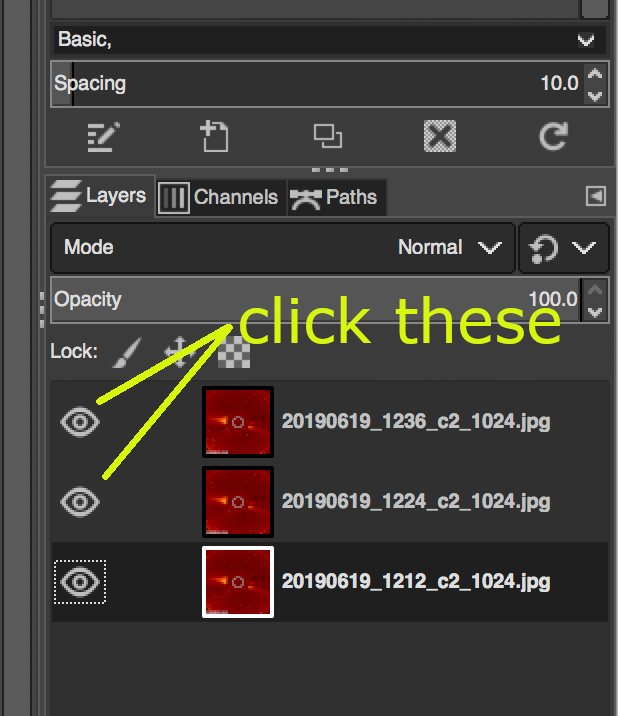
This should leave just the 12:12UT image displayed. Now you want to zoom in on the region you saw the comet. In Gimp you can either press the "+" key to zoom the image, use the menus go to View > Zoom > Zoom In, or - the easiest way - is to press the "z" key and use your cursor to select a zoom region. Again, other software may do this differently, but most of them should have this functionality.
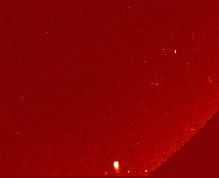
Now hover the cursor directly over the comet. Somewhere in the application window there should be a display that shows the location of the cursor in x,y pixel coordinates. GIMP shows this n the lower-left corner of the window (shown below). Those are the positions that you need to report to the website.
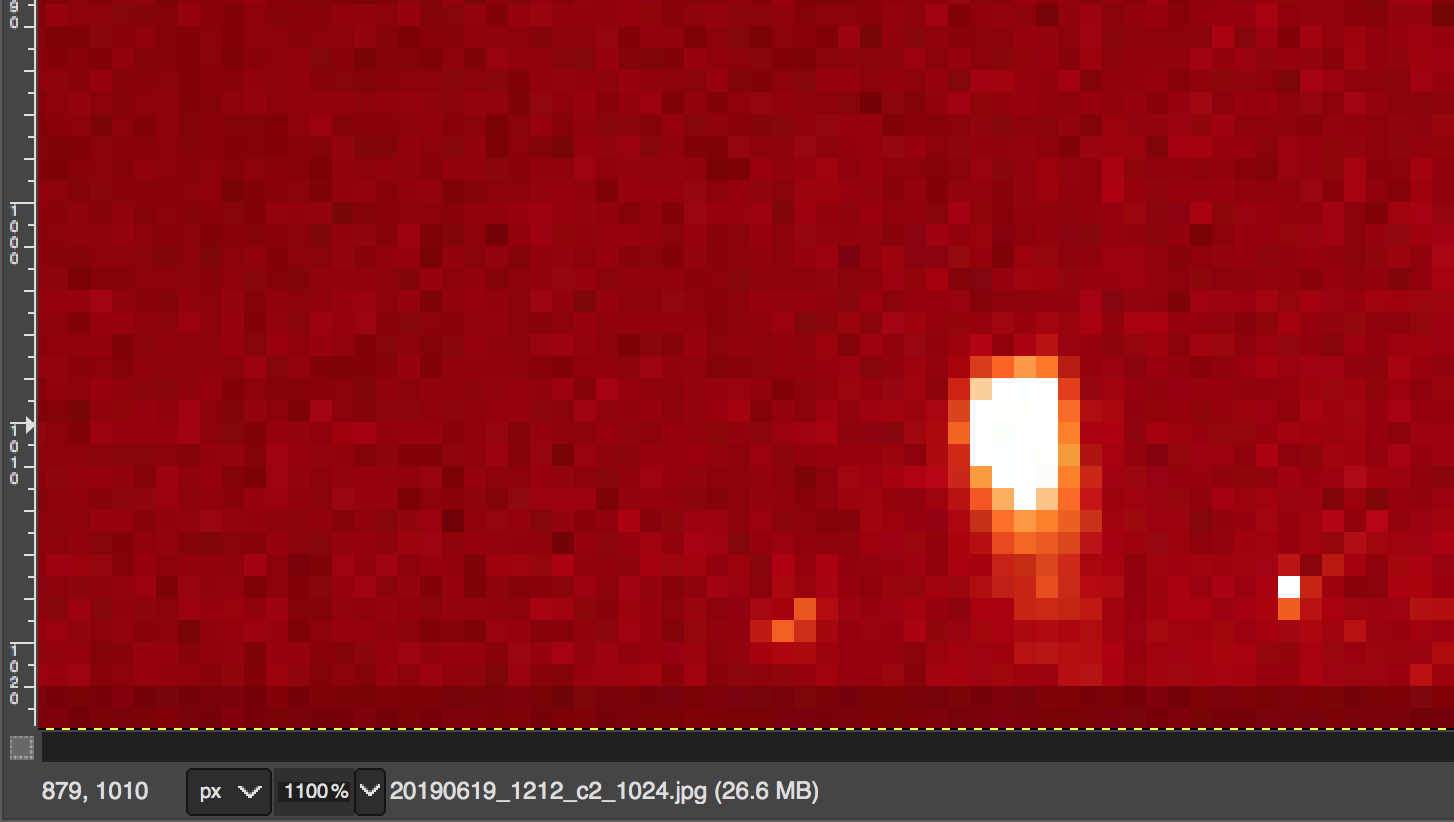
In this first image - 12:12UT - the cursor is showing a value close to "880,1001" for the comet location. There might be a difference of a pixel or three depending on your software and where you position the cursor - that's ok.
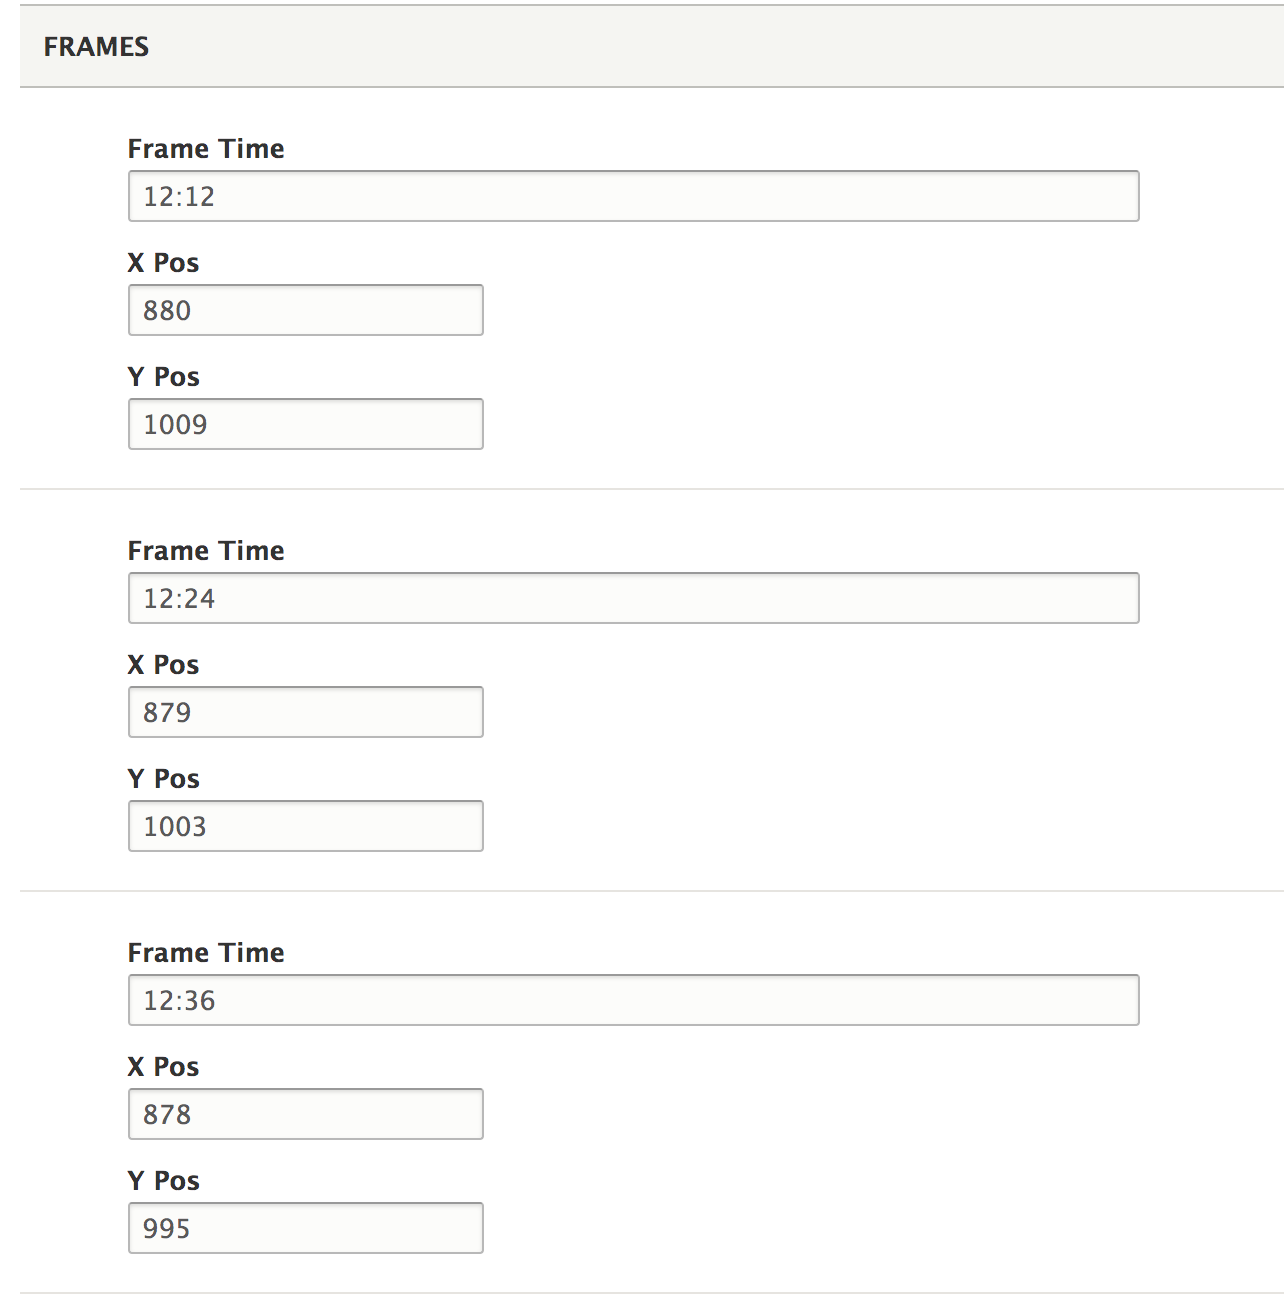
All that is left to do now is measure the other positions by toggling the visibility of the other layers and measuring the comet posision. In GIMP we would click the eye-ball icon next to the image you want to look at, and deselect the eyeball for the image you are done with. For this object, you should be left with coordinates that are something close to:
20190619 1212: 880, 1009
20190619 1224: 879, 1003
20190619 1236: 878, 995
These would be the positions that get entered into the comet report form.
STEP 6: Report the Comet
To keep this tutorial short, we are assuming that you have performed all of the necessary checks to make sure that your reported object is indeed a comet. It is strongly encouraged (required) that you are familiar with the instructions on what you should and should not report, and have tested to make sure that your potential comet obeys the laws of physics! All of that information can be found in the SOHO Comet Hunting Guide.
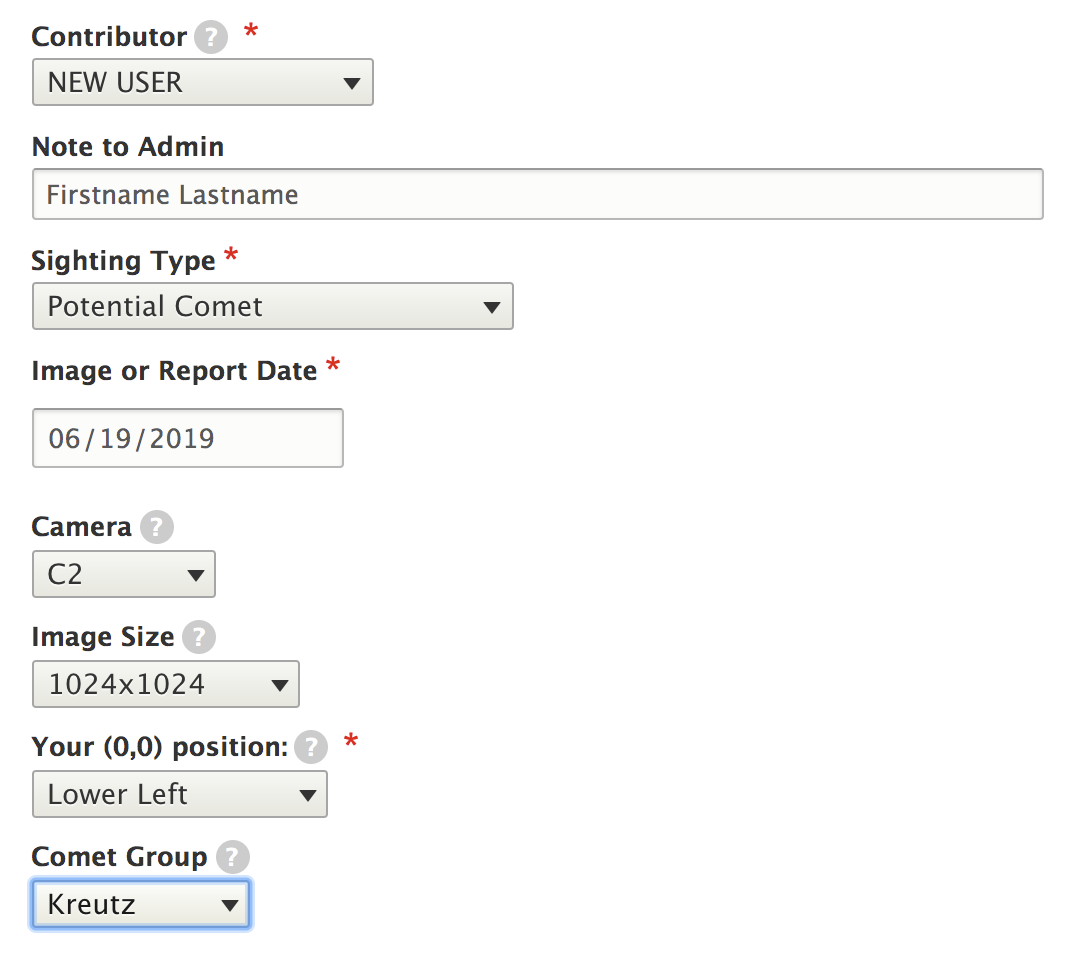
To fill out the report form, first select your name from the drop-down list. If your name is not there, select 'New User' and add a comment in the 'Note to Moderator' field with your full name. (We can not credit you with discovering a comet if we do not know your name!). You will then fill the form with the information shown below. Two important things:
1. The "(0,0)" position refers to the origin of your software's coordinate system. To determine this, place your cursor in all four corners of any image, and not down which corner has the smallest x,y values (the closest to (0,0)). Only one corner will have both x and y coordinates close to zero. On most Windows operating systems, this will be the upper-left corner. On Mac and Linux it tends to be the lower left.
2. If you do not know which comet group your object belongs to, that's ok. Just leave it blank.
The critical information we need is your name, the date and times of the images you are looking at, and the pixel coordinates of the object. You do not need to worry about any of the other options until you are more familiar with the program.
Click the 'Save' button at the bottom of the page, and your report will be submitted. You can view the latest reports here.
Finally, we reiterate once more that you should make yourself familiar with the SOHO images and comets, what to look for, and what you should and should not report in the images. This information and more can be found on the Comet Reporting Instructions page, and on the Official Guide to SOHO Comet Hunting.
DISCLAIMER: The use of the "GIMP" software package here is entirely for illustrative purposes of how such a software application can be used to search for and record observations of comets. This is specifically not an endorsement of this or any other software application. It remains the responsibility of the user to choose which software package to use, to determine if their computer is capable of running their chosen software package, and to download/install the software from a trusted source. We are unable to provide any assistance with obtaining or installing any specific software packages, or any problems encountered while doing so.